Have you ever been to a theme park and wondered how they build such amazing rides?
With this activity, now you can be the creator of your very own roller coaster!
Your Goal:
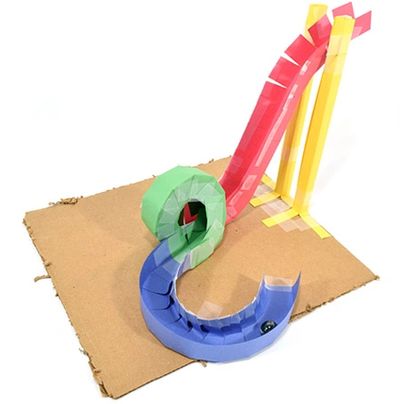
Build a roller coaster that has a hill, loop and curve where the marble can travel to the end point
Materials:
- Tape
- Scissors
- A marble or two
- Ruler
- Pencil
- A4 Paper (at least 5 sheets)
- Thick cardboard (approx 30cm x 30cm)
Instructions:
Download and print the roller coaster templates (located below). Ensure you print on one side only. You may want to print the template 2 or 3 times if you want to build a bigger roller coaster.
Once printed, cut out and fold your segments as per the instructions on the print outs. From here, have a look at how the tracks bend and move. Start to build ideas about how you would like your track to run. Use a pencil, ruler and paper to draw out some of your ideas and start to plan your roller coaster.
When you and your team are happy with a design for a roller coaster, start to cut out and fold the sections as per the instructions below.
Building a straight segment:
- utilise a hill/loop segment you have cut out and folded as per the instructions on the paper, but don’t cut through the individual tabs on the sides, this will keep the track straight.
- fold the sides upwards towards the sky.
Building a loop or a hill:
- utilise a hill/loop segment you have cut out and folded as per the instructions on the paper
- make sure to cut out each of the individual tabs on the sides
- fold the tabs upwards
- bend the track into the shape you want, and tape the tabs together to hold it in place. You may need another person’s help while doing this.
Building a curve:
- utilise a curve segment you have cut out and folded as per the instructions on the paper
- make sure to cut out each of the individual tabs on the sides
- fold the uncut side upwards so that it forms a wall
- fold up the tabs on the other side, but the cut tabs side will be placed as the bottom
- bend the segment horizontally into a shape you are happy with then get some help to tape the tabs together.
Building a support strut:
- utilise a support segment you have cut out and folded as per the instructions on the paper
- fold along the lines to form a square shape and use tape to hold in place, note that it will overlap
- the tabs you have cut at the end of the support, these will fold outwards and the piece of the support to tape down to the cardboard.
Check
you have all of the pieces you need as per your design.
Once you have all of your pieces, start to construct your roller coaster on your piece of cardboard. Tape down your supports and track pieces as you go.
During your construction, you may want to try some test runs with your marble to ensure your track pieces are lining up and providing enough motivation for your marble to reach the end of the track.
When finished, run the marble through your design and ask yourself:
- has the marble made it to the end point? explain why it did or did not.
- what could be done to improve the design?
- what other materials could be used to create another element to the roller coaster?
There is a simple rubric to try found in the downloads section below.
Continue your roller coaster!
Why not try to make a bigger roller coaster and see how long you can go before the marble stops. Think about the steepness of your hills and how your loops and curves can affect the momentum of the marble.